Pages

Monday, August 30, 2010

Victorian Rose

Welcome - thank you for visiting. Thankfully life has slowed a wee bit since I last posted - I am not that happy with life moving faster than I can keep up with it.

As part of the Priscillastyles group on Crafters Digital Art Centre, when we reached 300 members Priscilla posted a 'freebie' digital stamp, an image called 'Victorian Rose' - this was for a limited time only.  It is now available at her shop - see the link in my sidebar.

I enjoyed useing this image on this card - initially I had to think through how I would use this, but then decided to go with the sketch from Midnight Madness Challenge #68 - again - this is the third time I have used this sketch for a card - it is one awesome sketch :-)  Thanks again to Priscilla.


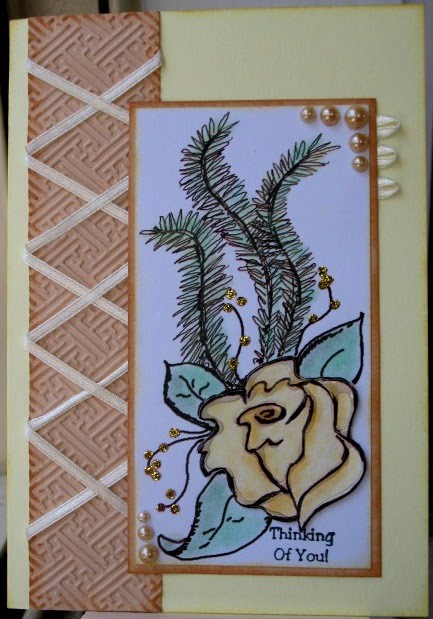
The fawn coloured panel to the left was embossed using the cuttlebug Oriental Weave folder, the edges sponged with Tim Holtz Tea Stain distress ink, and then some cream ribbon was wound around the card.  The same ribbon was used to create the three wee features on the right of the main panel.

The image was printed twice, and just the rose was cut out from one of them.   The image was coloured with chalks, gold Kindy Glitz added to the berries, and dimensional magic around the lines of the rose flower.  When this was dry,  the  single image was mounted over the base image with several layers of double sided tape - I did not want to raise it too much, just to emphasis the flower.  The finished panel was sponged with some yellow ink, then mounted on fawn card which had also been sponged.


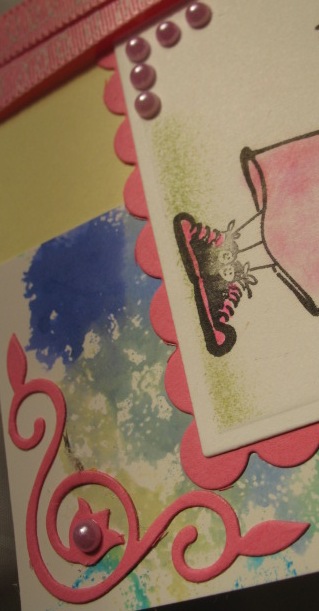
As I wanted to send this card to a friend who is not well, I found one of my very first stamps and stamped it at the base of the flower in black ink to let her know I was 'thinking of her', and pearls added to the corners for an added emphasis.


Friday, August 27, 2010

MMSC #68

Hi, Just a quick post today as I am in a rush - so much happening and so little time to do it in :-)


I have made this card for the Midnight Madness Challenge #68  and I must admit I took a few liberties with the design.  I used the Chandelier image from priscillastlyes store , and added some dimension and sheen using dimensional magic on the lamps.


Instead of lacing the side panel I punched both sides of the gold paper and layered it onto black, and then added the same punched edge to the corner of the main image.  To add some glamour I attached rhinestones to both pieces.


The main image was sponged with a yellow ink, mounted on gold and then black,  the top corner was pierced before I layered it and the gold shows through - much to my delight.

I am linking this to


Thanks for calling by - I appreciate your visits and your comments are treasured.


Have a blessed day.


Tuesday, August 24, 2010

Sunflower Sunshine

Good day to you - thank you for visiting my blog.


I have recently been 'playing' with digital stamps, and have come to the conclusion that I enjoy working with them... after a few hit and miss experiments, some of which missed :-)  But that is all in the learning curve.


I have also been honoured to be asked to be part of the Priscillastyles Design Team, this has increased the angle of the learning curve dramatically, but I am enjoying the challenge. 


This is one my first cards using a Priscillastyles image - this is a freebie available here.


 I printed the image and  coloured it with chalks, cut it out using Nestibilities and sponged the edge of the oval before removing the die.  I mounted it onto a scalloped oval, and then added the buttons - from my inherited stash from both my Mother and Mother in Law!


Before mounting the ovals onto the green cardstock, I put several wraps of paper ribbon around it to form a background, then layered the whole onto the bright orange base - then realised I wanted a sentiment on the card.


I stamped and embossed a greeting using the Hero Arts Tiny Happy Birthday stamp, and very carefully shielding the rest of the card with scraps of cardstock so I didn't melt anything - having been there and done that recently!!


I am linking this to 
Crazy4challenges # C4C51 - sketch challenge


Thanks for calling by and I do appreciate you comments.


Have a blessed day.

Wednesday, August 18, 2010

For fun

Welcome once again and thank you for calling by.

I decided that I would make a card simply for fun - and with a couple of challenges in mind.  My starting point was an image I was sent in a RAK from my dear friend Linda, that has a pithy quote accompanying it!!


I had hoped to trim the total image to an oval, but it just would not 'work', so I had to go with a rectangle and a scalloped edged rectangle underneath it.


The colours took some time to 'come together', and they are not a colour combination that I would typically use being lemon and bright pink, with some blue in a background panel.


wanted to put a focal point on the ribbon, but had nothing on hand, so improvised instead with a jewelery pin, some beads and a pair of pliers to twist the end with.  I also added some half pearls in lavender to accent the floral corners and one corner of the main image.  


This is the end result, which when looking at it again, still brings a smile to me.

I am linking this to: 

and 
                                 based on Proverbs 17:22

                  "A cheerful heart is good medicine, but a crushed spirit dries up the bones." 

This scripture holds so true, and I personally know that if one can keep a positive attitude in the more difficult times of life, and can have a laugh with a friend, life seems to be so much more bearable.

The challenge is to use humour in a card, and I think this fits the bill.

I appreciate you visiting, and leaving a comment - may your day be blessed.

Tuesday, August 17, 2010

Simple encouragement

Thank you for calling by - I enjoy knowing you have called.  

I got an hour in the studio this afternoon and completed a card that I am really rather happy with.  I had in mind a challenge by Our Daily Bread Designs for a "go to" sketch - hence the simplicity of this card, and I also used quite a few odds and ends that were on my desk.


The background paper is a piece of copy paper that I used as part of a sandwich in the cuttlebug when I 'pounded' some pansies a few weeks ago.  I filled in the 'gaps' in the background with yellow chalk, and then sponged the edges with some Memento Pear Tart ink to give them some definition.  It is not obvious, but it made a difference IRL when I did it.  I then put the paper through the cuttlebug embossing folder bird song.

I then decided to use blue on the feature panel - the scripture, from Our Daily Bread Designs, Scripture Collection 1, was clear embossed over Brilliance Mediterranean blue ink, and the edges were sponged in Memento Blue Danube ink.


The two layers of gold ribbon were used to give some more dimension, and a wee bow of the narrow ribbon was added to soften the total look. The bow was tied on my fingers, using a technique  perfected when working in a shop and wrapping gift parcels, and adhered using a glue dot.


I was pleased with the outcome of this card, and hope you have enjoyed the journey too.

This is being linked to:
 Our Daily Bread Designs Challenge SNTODBD15 - Use a "go to"  sketch

Thank you for your visit, and I love to read your comments.

May your day be blessed.

Sunday, August 15, 2010

Butterflies and Birds

Warmest greetings to all who call by - I have enjoyed another Sunday afternoon in the studio and have something to show for it, which I will share here. 

I have also designed my Christmas Card for this year.  I have had the idea for that simmering for a while, and I want to get them started as I have borrowed a Cuttlebug folder to use on them.

Todays card used the sketch challenge at Midnight Madness as a starting point, and I also wanted to incorporate some acetate embossed in the cuttle bug for another challenge.

I found this sketch quite a challenge - as it is supposed to be - but I got there - eventually, with my own interpretation.


The two ribbons are silver chiffon, - the narrow one has some silver threads in the edges. 


I embossed the butterflies from the Layers of Color
Flutterescent Set in silver, and added a wee bit of colour with some twinkling H2O's, which also gave an added  sheen to them.


The 'cut out' butterfly also had some clear rhinestones added to give some dimension to the body.


The acetate is some that was painted with Lumiere paints some time ago, it was run  through the Cuttlebug Birdsong folder to give some added dimension, it was backed  with some kraft coloured card before being mounted on the card as part of the sketch.

The card was finished with the addition of some silver edged lace, half a dozen moulded flowers I was given recently, to which clear rhinestones were added to the centres, and further rhinestones were added to the left side of the ribbon to give the card some balance. 

This card is being linked to the following challenges.
and

Thanks for calling by, and I do appreciate any comments you leave - they make my day.

May your day be blessed.

Friday, August 13, 2010

Kimko and Blossom

Greetings to my guests :-)  My apologies for being M.A.I., but life conspired against me both card making and blogging, but I did manage to get into the studio this afternoon and make a card.

I used the Cuttlebug embossing folder called Kimko - which has an image of a Japanese girl for the first time today.  I ran some gold metallic paper through it, and I was very pleased with the result.  Unfortunately the light was terrible by the time I had completed the card, so I have scanned it, not photographed it, and the sheen did not show as well as it does in real life.


The base card was a pale blue and looked insipid, so  the edges were sponged with Memento Blue Danube ink, which really made it pop! 

The blossoms are a digi-stamp from The Creative Mind Of Sylvie - My SIL last weekend spent ages upgrading my computer, and I could not work out how to shrink the image on the programmes I now have, so I printed it full size and trimmed a couple of branches from it!!  Where there is a will there is a way!

I coloured the flowers with chalks and adhered them using my xyron machine.

The greeting was gold heat embossed and the card was complete.

Thanks so much for visiting, and being patient when I was not able to post.

May your day be blessed.

Sunday, August 1, 2010

Buttons & A Bear

Greetings  to all my cyber visitors from a cool and wet and windy Antipodean Island.

I am still with family further north than 'home', so I know that it is not as cool as in other parts of the country - there is snow forecast in some areas to quite low levels. As I am not a fan of snow, I am quite happy to live where we do, and to be visiting further north at the moment, although I do miss DH, the cat, and my studio.

I thought I would share a card I made the week before I came away - I made it with a couple of challenges in mind, but never got it online in time. :-)

The challenges were to use buttons and something you had had/not used for over 12 months.  The stamp is one of my original ones, bought some 10 years ago... and I have not used it for years and subsequently it has languished at the back of a drawer.  


I stamped Winnie-the Pooh in black ink and embossed him, and then painted him using watercolour crayons, mounted the image to one side of an iridescent wrapping paper and then on the white card, which I distressed and sponged with red ink.

After fossicking  among my late mother-in-law's button collection, I found the five red buttons, and the sewed them on the border. This done I mounted it onto a bright blue card base.  

The greeting, from Kiwistamping, was stamped in red and embossed onto white card.  Then edges of this were distressed and sponged to match the other section, before filling in the font with a red pen to give the whole some balance.

I like the overall effect of this card and was happy with the outcome, although the layout fought me for a while.

Thank you for visiting, and may your day be blessed.